If you stream on Twitch in landscape but want to grow on Shorts, TikTok, and Reels, you already know the hard part isn't finding moments — it's the reframe. Learning how to reframe gameplay to vertical for Shorts means taking a wide 16:9 clip and rebuilding it into a 9:16 frame that still reads on a phone: the action centered, your facecam visible when it matters, and captions that land even on mute. Done by hand in a traditional editor, that's fiddly keyframing and masking for every single clip. VODcraft turns it into a few clicks.
This guide walks through the exact workflow gaming streamers use to turn one VOD into a stack of vertical clips — choosing between a cam-on-top stacked layout and a game-only layout, reframing the gameplay so nothing important gets cropped out, and adding animated captions before exporting a ready-to-post Reel or an editor-ready XML for Premiere, DaVinci Resolve, or Final Cut.
Why vertical reframing is different for gaming
Generic auto-croppers were built for talking-head podcasts and webinars. They track a single speaker's face and call it done. Gaming is harder: the moment that matters might be a crosshair flick in the top corner, a killfeed on the right edge, a minimap, or your own reaction on the facecam — sometimes all at once. A naive center-crop throws half of that away.
That's why reframing gameplay well usually means making a real layout decision rather than trusting a one-size auto-crop. The two layouts that work for almost every game:
- Cam-on-top (stacked): webcam fills the top portion, gameplay fills the bottom. Best when your reaction sells the clip — clutch wins, jumpscares, rage, big plays where the face is the payoff.
- Game-only: the gameplay fills the entire vertical frame, reframed and scaled so the action stays centered. Best for pure mechanics, montages, or when there's no facecam worth showing.
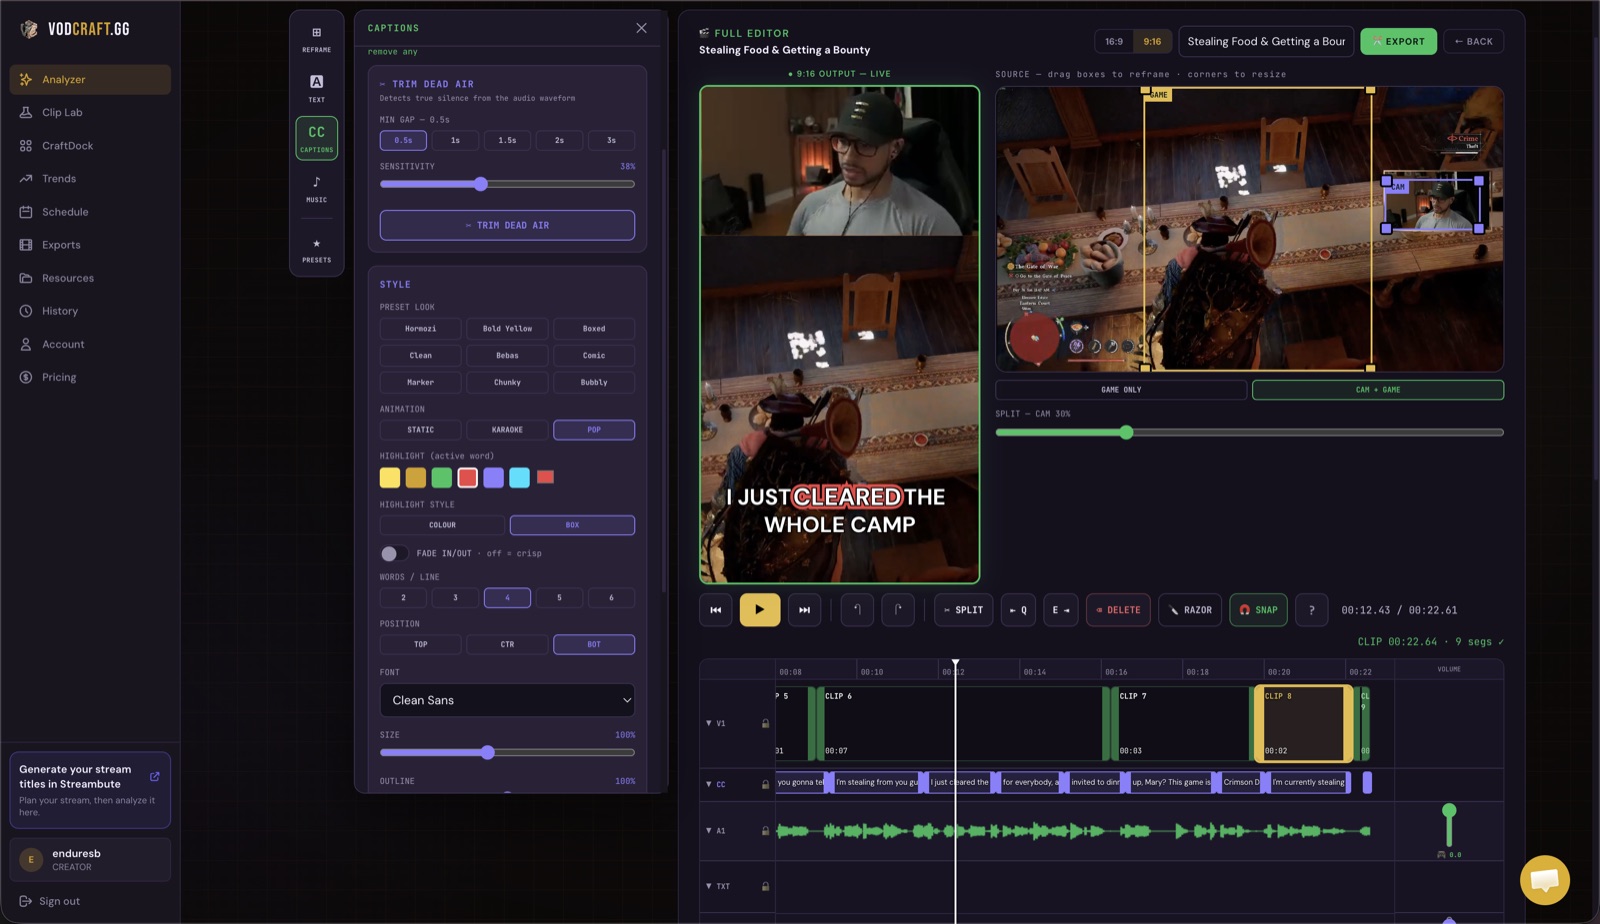
How to reframe Twitch gameplay to vertical: step by step
Import your VOD and pick a clip worth posting
Connect a Twitch VOD or upload a clip. VODcraft's AI scores moments by virality signals and chat spikes, so instead of scrubbing hours of footage you start from a ranked list of moments your audience already reacted to. Pick one and send it to the editor.
Switch the canvas to 9:16 vertical
In the editor, set the aspect ratio to 9:16. The canvas instantly reframes to a vertical Shorts/TikTok/Reels frame so you're previewing the clip exactly as a phone viewer will see it.
Choose your layout: cam-on-top or game-only
Pick the stacked layout to place the webcam on top with gameplay below, or the game-only layout to fill the frame with the action. You can flip between them to see which reads better for that specific moment before committing.
Reframe the gameplay focus
Pan and scale the gameplay crop so the crosshair, killfeed, character, or objective stays inside the 9:16 window for the whole clip. This is the step generic croppers get wrong — here you keep the part of the screen the moment actually depends on.
Add animated captions
Generate auto-captions, choose an animated word-by-word style, and position them in the vertical safe zone. Most short-form viewers watch muted, so captions are what keep a thumb from scrolling past your clip.
Export a Reel or editor-ready XML
Export a finished vertical Reel ready to post, or export editor-ready XML to open the reframe and captions in Premiere Pro, DaVinci Resolve, or Final Cut and finish in your own NLE.
Tip: keep your most important on-screen info — health bars, killfeed, the crosshair — out of the very top and bottom of the 9:16 frame. Platform UI (captions, usernames, the share buttons) covers those edges, so center the action and let the safe zone breathe.
Cam-on-top vs game-only: which to use
There's no universal answer, but a simple rule covers most clips. If a viewer would understand the moment from the gameplay alone — a flick, a combo, a clean ace — go game-only and give the action the whole frame. If the moment lives in your reaction — the scream, the disbelief, the celebration — go cam-on-top so the face and the play land together. When in doubt, stacked is the safer default for personality-driven channels, because it keeps you on screen and trains viewers to recognize your face across clips.
Why animated captions aren't optional
On Shorts, TikTok, and Reels, a large share of viewers watch with the sound off, at least for the first few seconds. Animated captions do two jobs: they make the clip legible on mute, and the motion itself draws the eye and improves retention in those make-or-break opening seconds. VODcraft auto-generates the captions from the clip's audio so you're styling and placing, not transcribing — which is what lets you turn a whole VOD into a batch of finished verticals in one sitting.